Rivet Nut Fundamentals: Types, Selection, and Compatibility
What Is a Rivet Nut? Core Function and Key Advantages Over Traditional Fasteners
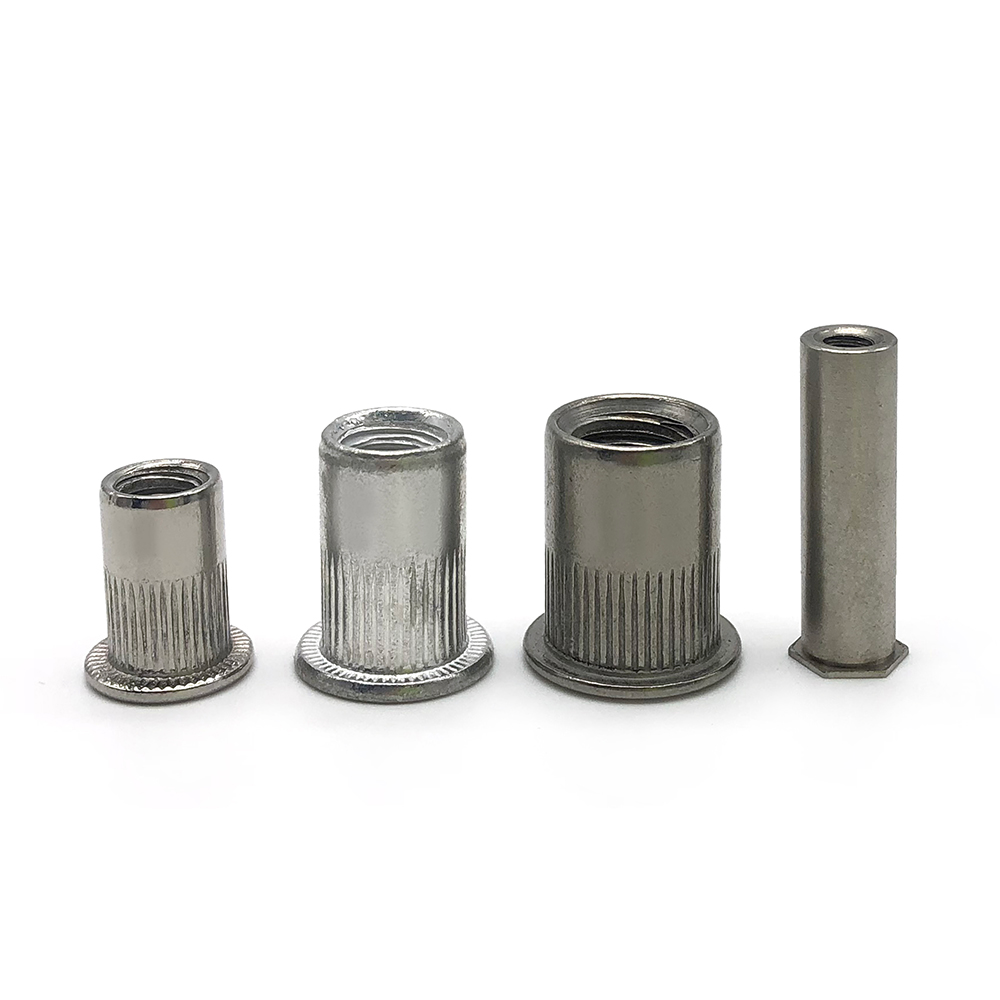
Rivet nuts, sometimes called nutserts or threaded inserts, are those special fasteners that create lasting internal threads inside materials too thin or hard to tap normally. When installing these little guys, they go in from just one side. The body is basically hollow and when squeezed into place, it actually expands outward around the hole. This expansion creates something pretty solid on the back end that holds up against vibrations while keeping those threads nice and tight. What makes them stand out compared to regular weld nuts or bolts that go all the way through? Well, no need to do extra work after installation or have someone reach from the other side of whatever material we're working with. Just pop them in and call it good.
Key advantages include:
- Superior vibration resistance: The expanded body absorbs dynamic loads more effectively than loose nuts or adhesives
- Broad material compatibility: Proven performance in sheet metal, aluminum extrusions, plastics, and fiber-reinforced composites—where tapped threads would strip or crack
- Efficient installation: Industry benchmarks show up to 70% faster deployment than welding, with no heat distortion or post-weld finishing required
- Serviceable joints: Bolts can be repeatedly removed and reinstalled without damaging the parent material or compromising thread integrity
Matching Rivet Nut Size, Thread, and Material to Your Substrate and Load Requirements
Optimal selection hinges on three interdependent parameters: thread size, grip range, and material pairing.
| Consideration | Impact | Selection Guide |
|---|---|---|
| Thread size | Dictates bolt compatibility and shear strength | Match exactly to your mating fastener (e.g., M6 bolt requires M6-threaded rivet nut) |
| Grip range | Determines effective thickness accommodation | Select a grip range that exceeds substrate thickness by 0.3–0.5 mm—ensuring full expansion without bottoming out |
| Material pairing | Mitigates galvanic corrosion and ensures thermal/mechanical compatibility | Use aluminum rivet nuts with aluminum substrates; stainless steel (A2/A4) for corrosive or high-moisture environments; avoid mixing dissimilar metals without isolation |
The load capacity really depends on two main factors: what kind of material is used and how long the threads engage. Aluminum fasteners generally handle static tensile loads around 5 kilonewtons, which works well for things like equipment enclosures or lightweight panel assemblies. When we move to cold forged steel or stainless steel options, these can take on much heavier workloads exceeding 15 kN, making them suitable for actual structural connections. Speaking of connections, anyone working with critical joints should remember that thread engagement needs to be at minimum 1.5 times the bolt diameter. This isn't just good practice either - it's actually specified in ISO standard 1478 and has become standard operating procedure across industries like aerospace engineering and railway construction where failure isn't an option.
Choosing and Preparing the Right Rivet Gun for Reliable Rivet Nut Installation
Comparing Manual, Pneumatic, and Cordless Rivet Guns for Different Production Volumes
Tool selection must align with production scale, environment, and precision requirements.
Manual rivet guns deliver simplicity and portability at low cost, making them ideal for infrequent use—such as field repairs, prototyping, or small-batch fabrication. Their mechanical leverage limits consistency across operators and extended sessions, increasing fatigue-related variability.
Pneumatic tools, powered by compressed air, provide repeatable force delivery and cycle times up to 40% faster than manual units in medium-to-high volume settings—particularly where fixed infrastructure supports reliable air supply. They excel in controlled workshop environments demanding uniform compression across thousands of installations.
Cordless/battery-powered models combine mobility with programmable force control. Modern iterations reliably install M12 stainless steel rivet nuts with ±3% force accuracy—critical for remote sites, mobile maintenance crews, or mixed-material assemblies where air lines are impractical.
| Tool Type | Best For | Key Limitation |
|---|---|---|
| Manual | Occasional/small jobs | High user fatigue; inconsistent force application |
| Pneumatic | Medium/large batches | Requires stable air supply and regulator calibration |
| Cordless | Mobile/remote sites | Runtime constraints; requires scheduled battery management |
Tool Setup Essentials: Nosepiece Selection, Mandrel Compatibility, and Calibration Checks
Getting reliable installation right starts with setting up the tools properly. The first thing to check is matching the nosepiece exactly to the outer diameter of the rivet nut. If the tip is too small or too big, it can lead to problems like misalignment, tilted flanges, or just plain incomplete expansion. Next up, make sure the mandrel threads match what the rivet nut needs. When they don't line up, cross threading happens, which cuts down on preload maybe around 25% and makes failures more likely when things get shaken up over time. Don't forget to calibrate the pulling force at least once a month with proper testing gear. Tools that aren't calibrated correctly will create weak installations where the pull out strength drops significantly, sometimes by close to 30%. Some newer models come with features that automatically adjust for different material thicknesses and give real-time feedback on force application. These kinds of capabilities are becoming standard requirements in many automotive Tier 1 supplier quality specs these days.
Tip: Always validate setup on scrap material matching your workpiece’s composition, thickness, and surface condition before initiating production runs.
Step-by-Step Rivet Nut Installation Process
Hole Preparation: Drilling Precision, Deburring, and Alignment for Optimal Rivet Nut Grip
The hole needs to be drilled cleanly and round, matching exactly what the rivet nut specs call for. Tolerance matters here - don't go beyond plus or minus 0.1 mm on the diameter. If the hole is too big, there won't be enough interference around the sides which lets things rotate when they shouldn't. A hole that's too small creates problems too, making insertion difficult and possibly warping whatever material we're working with. Right after drilling, take care of those burrs on both sides. Use either a countersink or proper deburring tool for this step. Those tiny little burrs might seem harmless but they actually cut down grip strength by as much as 30% according to tests from ASTM F2309 standards. Before anything else, blow away any leftover bits and pieces with dry compressed air so nothing gets stuck between the flange and our base material. When positioning everything finally, make sure the rivet nut sits completely flat against the surface without gaps anywhere. Even the smallest space will cause uneven pressure distribution and lead to early failures in the connection.
Insertion and Actuation: Proper Mandrel Engagement, Trigger Technique, and Stroke Completion
Start by threading the rivet nut onto the mandrel manually until it sits properly in place. Don't try forcing it or reach for any tools since this can actually mess up the threads. Next, make sure the whole setup is at a right angle to whatever surface we're working on. Apply consistent pressure along the axis to keep everything lined up while we go through the process. When squeezing the trigger, do it all in one single movement without stopping halfway. If we pause during this part, the plastic won't expand properly and we'll end up with an incomplete installation. Keep going until we feel resistance under our fingers, which tells us the metal has deformed enough around the sides. Going too short leaves gaps inside that can cause problems later. But watch out for going too far too because excessive compression puts stress on those inner threads and might lead to issues when inserting bolts down the road like galling or stripped threads.
Post-Installation Verification: Mandrel Break-Off Confirmation and Pull-Out Strength Check
Confirm successful installation with three objective checks:
- A distinct audible “snap” signaling clean mandrel break-off
- Visual verification that the flange seats fully and evenly against the substrate—no rocking or tilt
- Functional thread check: a mating bolt should engage smoothly and rotate freely without lateral wobble
For safety-critical or high-reliability applications (e.g., transportation, medical devices), destructive pull-out testing on statistically valid sample sets is recommended. Per ISO 14587, properly installed rivet nuts in mild steel substrates consistently exceed 1,500 PSI shear strength—outperforming conventional clinch nuts and self-clinching inserts in vibratory service.
Troubleshooting Common Rivet Nut Installation Failures
Underset, overset, and offset installations represent the most frequent root causes of field failures.
- Underset rivet nuts exhibit insufficient radial expansion—evidenced by flange lift, spin-out during bolt tightening, or low pull-out values. Primary drivers include incorrect grip range selection, worn mandrels, or under-calibrated tools.
- Overset installations result from excessive force or prolonged dwell time, causing thread distortion or separation between the threaded and unthreaded sections—often visible as cracked or split bodies post-installation.
- Offset installations, caused by misaligned nosepieces or substrate warpage, create non-uniform clamping and dramatically increase susceptibility to both spin-out and pull-out under load.
The problems go way beyond just looking bad. According to a recent report from the Ponemon Institute in 2023, when rivet nuts are installed incorrectly it can cost around $740,000 each year for repairs on a single production line. That money goes out the door because of all the extra work needed, warranty issues popping up, and unexpected shutdowns that throw everything off schedule. To stop this kind of mess, manufacturers need to focus on proper calibration practices, regular checks of those mandrels, and keeping an eye on force levels as they happen in real time. And this isn't something that only matters at the beginning when setting things up. These maintenance steps should continue throughout different shifts and whenever new batches of materials come into play.
FAQ
What is a rivet nut and why are they used?
Rivet nuts, also known as nutserts or threaded inserts, create internal threads in thin or difficult-to-tap materials. They offer advantages like superior vibration resistance, broad material compatibility, and efficient installation.
How do I choose the right rivet nut for my project?
Selection depends on thread size, grip range, and material pairing. Match the thread size with your fastener, select a suitable grip range, and ensure material compatibility to prevent corrosion and ensure mechanical integrity.
What types of rivet guns are available and which one should I use?
Manual, pneumatic, and cordless rivet guns are available. Tool selection should align with production volume, environment, and precision needs. Manual guns are best for small jobs, pneumatic for larger batches, and cordless for remote sites.
How can I prevent common installation failures?
To avoid issues like underset, overset, and offset installations, focus on proper tool calibration, mandrel checks, and monitor force levels regularly.